1410 GREG ST. SUITE #412
SPARKS, NV 89431
775.229.7200
HOURS: 8AM – 5PM PST M-F
#EVERYONEWANTSACCESS
This will show you how to use your quickprint app for your event.

On the Windows toolbar you should see an application shortcut on there called Quickprint.
The icon looks like this:
![]()
Click that icon and the application should show up on your desktop.
 In order to customize your printed fields please select the “Settings” button that is located in the top right of the application.
Once clicked this will open the configuration for the app. You will see below the template settings a series of form fields. These fields can be named whatever you need them to be.

You should make sure that when your putting in your custom fields that you have the word “Name” in the field you want the attendees name as this helps with our system to build out your exports.
Click the save button and now you will see the changes within the badge screen.

 In order to insert an image or take an image using a web cam you will need to click the badge image that is in the center of the form.
Once you click that it will open up a popup that has many options to upload or take a photo.

On the top left of the screen is a menu icon that you can click to change what type of media you are trying to load into the app.

Upload from PC:
In order to upload your image from you’re pc please select that menu and click the “My Device” button. This will open the windows file explorer that will allow you to navigate to where your image is and upload it normally.
Upload from URL:
In order to upload from a url have the url copied and select the “From URL” button and input your url into the field. Then press upload. This will fetch the image and upload it directly to your app.

Take a Picture:
By default this system will open your webcam and allow you to take a picture. This is done simply by clicking the “Take Picture” button.
After Uploading image from any media:
The system will now show you the image you have taken or uploaded and will allow you to crop it in order to get the proper size and aspect ratio for the badge.
Crop your photo and click the “Crop” button.

 In order to print a badge please make sure your printer is connected to the PC and turned on.
After the printer is ready to go (and loaded up with passback badges) please fill out the form and add an image in order to get an accurate test of the hardware and software.
Click the “Print” button at the bottom of the badge form.
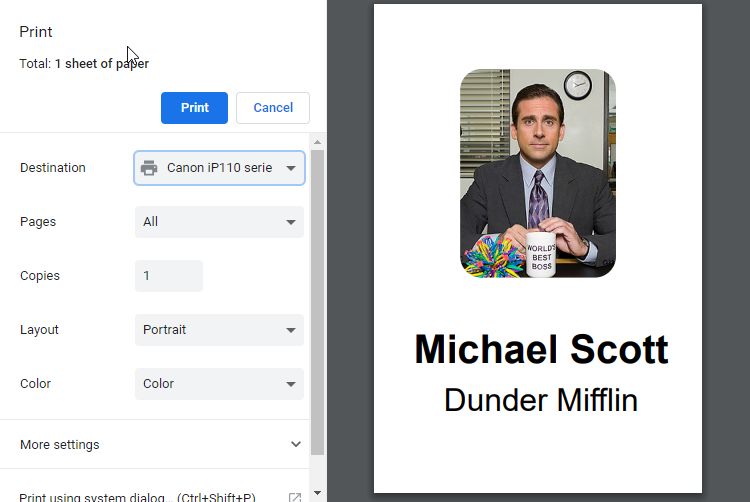
A standard print dialog will appear and you can just press “Print” on that as well.
After clicking print the printer dialog shows up. Click Print on here as well as long as the Canon printer is selected.

At any point you may export a CSV of the Attendees you have printed through the system.
This will allow for you to get an accurate recalling of who was printed and when.
This export comes complete with the image url and a timestamp of when the badge was printed, it will even show if someone was printed twice.
In order to export please open the “Settings” page by clicking the “Settings” button in the top right corner of the app. Once clicked scroll down on the app until you see the “Export Attendees” button.
Click that and select a place on the computer that you would like to save this export.


Now that you have saved the export in the location you chose.
Go to that folder you selected to save the export and you are free to save this to where you need it via E-mail, USB thumb drive, or uploading it to a dropbox service in order to get this export to your own personal space for future use / reporting.